Class 6 - Score, Currency & Upgrades
本节课承接上一节课(Class 5)的 UI 与生命值系统,继续完善 SpaceShooter 的“游玩逻辑”:得分、货币与五项升级功能,并完成按钮事件绑定与最终测试。
Class 6 Overview
- 得分与货币系统
- 五项升级功能(Repair、Hull Strength、Fire Speed、Missile Speed、Multiplier)
- 按钮事件绑定
- 最终测试清单
1. 得分与货币系统(GameController)
GameController.cs
using TMPro;

public class GameController : MonoBehaviour
{
    public static GameController instance;

	// 记得要在Inspector中拖拽赋值哦
    public TMP_Text textScore;
    public TMP_Text textMoney;

    public int score = 0;
    public int money = 0;

	void Update() {
		UpdateDisplay();
	}

	void UpdateDisplay() {
		textScore.text = score.ToString();
		textMoney.text = money.ToString();
	}

	public void EarnPoints(int amount) {
		score += amount;
		money += amount;
	}
}
接下来转到Projectile.cs,在击毁陨石时,也就是在OnCollisionEnter2D函数中加上:调用刚写的EarnPoints()函数
Projectile.cs
void OnCollisionEnter2D(Collision2D other)
{
    if (other.gameObject.GetComponent<Asteroid>() != null)
    {
        Destroy(other.gameObject);
		Destroy(gameObject);

        GameObject explosion = Instantiate(
            GameController.instance.explosionPrefab,
            transform.position,
            Quaternion.identity
        );
        Destroy(explosion, 0.25f);

		// 加这里!!得分 & 加钱逻辑
        GameController.instance.EarnPoints(10);
    }
}
2. 五项升级功能
2.1 Repair(Ship)
Ship.cs
public void RepairHull()
{
    int cost = 100;
	if (GameController.instance.money >= cost && health < maxHealth && health > 0)
	{
		GameController.instance.money -= cost;

		health = maxHealth;
		imageHealthBar.fillAmount = health / maxHealth;
	}
}
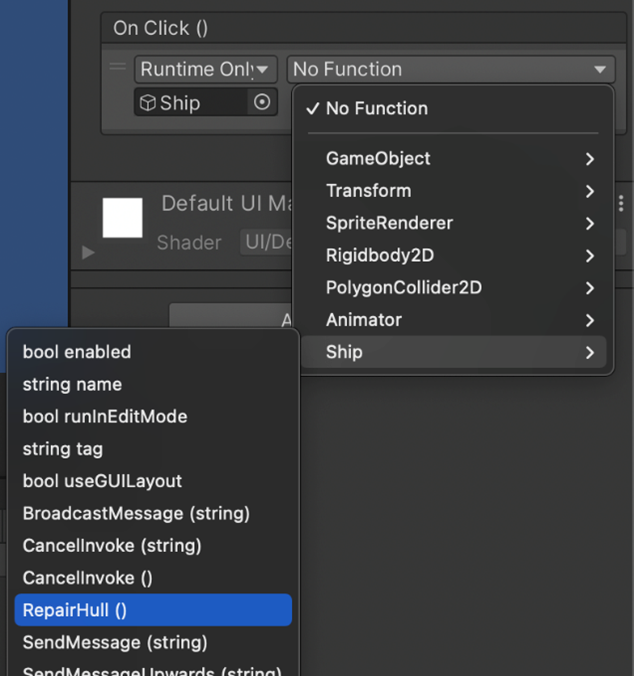
然后我们需要去 Button 的 Inspector 里面,找到 OnClick 事件。把 Ship 对象拖过来绑定,就可以获取到它身上携带的脚本,从而可以选择RepairHull()。
这样做的意思就是:当按钮被点击时,调用Ship身上的RepairHull()函数。
2.2 Hull Strength(Ship)
Ship.cs
using TMPro;

namespace SpaceShooter
{
	public class Ship : MonoBehaviour
	{
		// 记得拖拽赋值
		public TMP_Text hullUpgradeText;

		public void UpgradeHull() {
			// 升级费用等于当前血量上限
			int cost = Mathf.RoundToInt(healthMax);

			if(GameController.instance.money >= cost) {
				GameController.instance.money -= cost;

				health += 50;
				maxHealth += 50;
				imageHealthBar.fillAmount = health / maxHealth;

				hullUpgradeText.text = "Hull Strength $" + Mathf.RoundToInt(maxHealth);
			}
		}
	}
}
同上,OnClick 绑定 UpgradeHull()。
String + int?
hullUpgradeText.text = "Hull Strength $" + Mathf.RoundToInt(maxHealth);
我们在这行代码可以看到,text作为一个字符串类型的对象,却可以通过 string + int 的形式实现拼接:
这是因为C#中,字符串在拼接的时候,会自动将不是字符串的类型加一个ToString()转换为字符串类型,这被称之为隐式类型转换。
2.3 Fire Speed(Ship)
Ship.cs
namespace SpaceShooter
{
	public class Ship : MonoBehaviour
	{
		public TMP_Text fireSpeedUpgradeText;

		public void UpgradeFireSpeed() {
			// 由于开火间隔越小,也就是射速越快,费用应该越高。所以我们需要在firingDelay前面加一个负号
			int cost = 100 + Mathf.RoundToInt((1f - firingDelay) * 100f);

			if(GameController.instance.money >= cost) {
				GameController.instance.money -= cost;

				// 这样降低间隔会没有下限,会出现bug
				// firingDelay -=0.05f;

				// 所以我们需要用Mathf.Clamp来限制下限
				firingDelay = Mathf.Clamp(firingDelay - 0.05f, 0.1f, float.MaxValue);

				int newCost = 100 + Mathf.RoundToInt((1f - firingDelay) * 100f);
				fireSpeedUpgradeText.text = "Fire Speed $" + newCost;
			}
		}
	}
}
2.4 Missile Speed(GameController + Projectile)
GameController.cs
namespace SpaceShooter
{
	public class GameController : MonoBehaviour
	{
		public TMP_Text missileSpeedUpgradeText;
		public float missileSpeed = 2f;
	}
}
既然这边声明好了一个新的子弹速度的变量,那我们就可以回去Projectile.cs里面,把之前直接写死的子弹速度和加速度,改成与GameController中刚声明的missileSpeed相关的变量:
Projectile.cs
void Update() {
	float acceleration = GameController.instance.missileSpeed * 0.5f;
	float maxSpeed = GameController.instance.missileSpeed;
}
回到GameController.cs中,实现UpgradeMissileSpeed()函数:
GameController.cs
public void UpgradeMissileSpeed() {
	int cost  = Mathf.RoundToInt(missileSpeed * 25f);

	if(money >= cost) {
		money -= cost;

		missileSpeed += 1f;

		missileSpeedUpgradeText.text = "Missile Speed $" + Mathf.RoundToInt(missileSpeed * 25f);
	}
}
2.5 Multiplier(GameController)
GameController.cs
namespace SpaceShooter
{
	public class GameController : MonoBehaviour
	{
		public TMP_Text bonusUpgradeText;
		public int bonusMultiplier = 1;

		public void EarnPoints(int amount) {
			score += amount * bonusMultiplier;
			money += amount * bonusMultiplier;
		}

		public void UpgradeBonus() {
			int cost = Mathf.RoundToInt(bonusMultiplier * 100);

			if(money >= cost) {
				money -= cost;

				bonusMultiplier++;

				bonusUpgradeText.text = "Bonus Multiplier $" + Mathf.RoundToInt(bonusMultiplier * 100);
			}
		}
	}
}
总结
那么到此,我们的第一个练手小游戏 SpaceShooter 就完成了。
在这一系列课程中,我们从零基础开始,一步步完成了一个小型2D射击游戏的开发过程。让我们回顾一下主要的学习路径:
- 起步阶段
- 安装开发环境
- 导入游戏所需的素材资源
- 核心控制
- 实现基础的 WASD 飞船移动控制
- 引入物理系统,学习了
Rigidbody和Collider两个常见组件 - 基于物理组件,构建了几种不同的飞船控制逻辑(静态移动、基于物理的旋转与推进)
- 游戏表现
- 添加动画系统,使角色和物体更加生动
- 学习了
协程(Coroutine)的概念,用于实现复杂的时间控制逻辑 - 制作了敌人生成与子弹系统,实现了最初的
AI行为逻辑(如自动锁定目标)
- 完整玩法
- 补齐了 UI 界面,包括血量系统、得分与货币显示
- 实现了升级功能,让游戏形成完整的游玩循环